Many hams who are thinking of adding a linear amplifier to their ATV transmitter ask if you really need to do the power and pedestal set up, and if you do, do you have to reset to go back to low power for close in work. The answer is yes if you run your amp at or near it's full PEP rating or above it's 1dB gain compression level! If your ATV transmitter does not have a pedestal set up or sync stretching pot such as using a cable modulator, you will need to adjust the drive to stay below the 1dB compression point so as not to squash the sync and send an unstable picture.
As with all Amplitude Modulated transmitters, you don't want to overdrive the amp which would both distort the waveform at the peaks and also splatter the band. Therefore you do have to do the drive setup to stay within the amps linear range. The pedestal needs to be reset depending on the amplifiers gain curve. If it were perfectly linear, the answer would be no. But most amateur amplifiers have gain compression from half to the full rated power output that needs to be compensated for with sync stretching in order to maintain the right video to sync ratio.
Our transmitters come set up with 13.8 Vdc applied, but some use them with 12V batteries. Anytime the applied DC voltage is changed more than 1/2 Volt it is a good idea to do the pedestal set up procedure. In addition, anytime a new crystal is put in and the trimmer caps re-aligned, you need to first set the pedestal pot to maximum power out and then do the set up. Once set, and no other changes are made, you need not do the set up until you do add an amp, change crystals or change applied DC voltage.
Not everybody has a power meter handy in the shack capable of showing the expected full power watts for the 440 band. Hopefully there is one or more in any give area and an owner who will stop by for a few minutes to make the set up. It is definitely necessary and very difficult to do by blind tweaking or hit and hope. You do need to measure the power output into the antenna coax.
Just like SSB voice if you shout or crank up the mic gain too high with the alc off, you can splatter the band. Now, more than ever, we need to be good spectrum neighbors. Unlike FM or CW, overdriving the amp will not only squash your sync, color burst and sound, but the intermod sidebands will be very strong and wide.
Set Up Procedure:
Set up is easy and just takes a few minutes with a small screw driver and power meter. Any added amp over 20 watts out must have it's own separate power supply because of the current varying at a video rate over any of the leads will get into any other equipment connected to it, especially the driving ATV transmitter. The amplifier power leads must be directly connected to the regulated power supplys terminals, never an external junction strip. The power is only regulated at the supply terminals and once it leaves the terminals there is significant inductance and resistance at the up to 5 MHz video frequencies that cause distorted ripple on the line and can affect the transmitted video.
Using a 100 watt rated amp as an example, here is the general setup procedure:
 1. With no video source plugged in, turn the pedestal pot in the ATV exciter/modulator to its maximum power position. Make sure the amp is connected to a good 50 ohm dummy load or low vswr antenna (less than 10% reflected). Also make sure the transmitter peak power output does not exceed the maximum rated amplifier power input -ie., if driving a Mirage D1010ATVN with a 20W TC70-20S, first turn the Transceiver power down below 10 Watts peak sync before connecting to the amp which has a max input rating of 15 Watts. Likewise with a Mirage D26N or D100ATVN, turn any 1 to 5W transmitter power down to 1 Watt PEP before connecting to the amp or you could blow the driver transistor.
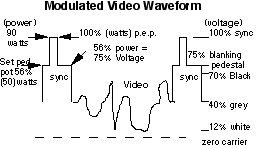
2. Turn on the amp and transmitter and quickly set the RF power pot on the exciter/modulator to no more than 90 watts, not 100, on a 100 watt rated amp (set drive power for 90% of the max rated power of the particular amp), you need some headroom for the sound that rides on the sync. If your ATV transmitter does not have an RF power pot, you will need to attenuate the drive with a 50 Ohm attenuator at the transmitter output - never detune the trimmer caps as it can distort the video or make the transmitter unstable.
3. Set the blanking pedestal pot for 50 to 60% of the max pedestal pot power - .56 x 90 watts = 50.4 watts but 45 to 54 watts on a 100 watt rated amp is close enough. This sets the final video to sync ratio.
4. Plug the camera back in and have a distant station on two meters talk your video gain in to just before white clipping or smearing. That's it. Your peak envelope power on sync tip will be the 90 watts regardless of what the power meter reads.
Now what happens when you turn the amp off for close in stations? Depending on the gain curve of your particular amp, you will have more sync than normal and the picture will seem to have less contrast. This may or may not be a big deal depending on the individual. Don't be tempted to crank up the video gain to compensate, you will just end up splattering the band - never get into white smearing.
Average vs. Peak Envelope Power
I frequently get calls from hams that just bought an ATV transmitter or transceiver saying that, "Your transmitter is rated at 20 Watts, but I cant get more than 8 Watts out of it." Of course they did not read the manual before plugging everything in and flipping the switch. On a 20 Watt pep AM ATV transmitter you would typically read 12 Watts with no video plugged in and any where from 7 to 12 Watts with video plugged in on an "average" reading RF power meter depending on the video gain setting and relative grey scale of the scene.
Some Facts:
1. Bird Wattmeters and most other RF Watt meters do not read true "average" power with complex AM waveforms like video and SSB voice.
2. Average power readings are only accurate for sine wave modulation and up to 500 kHz.
3. Peak Envelope Power (PEP) is the only accurate and meaningfull way to compare ATV transmitter power levels between stations as it takes a lot of variables out of what goes into the reading on an "average" reading and some peak reading watt meters.
4. On an average reading wattmeter under video modulation, the power reading will decrease as the picture goes toward all white or the video gain is increased. With a true PEP reading meter, the reading will not change by what is in the picture or varying the video gain pot.
5. With video, the PEP is the instantaneous power at the sync tip. If you are curious as to the PEP, unplug the video and turn the pedestal pot to max power. This will be the Peak Envelope Power you are putting out on the sync tip. Dont forget to reset back to the pedestal level.
You will hear many ATVers mentioning putting out so many watts "average" power because of the type of watt meter they have. This is meaningless since the Wattmeter will read many different levels for the same peak envelope power depending on the blanking pedestal set up, video gain and picture content. This is why all complex AM modulations are compared to each other by peak envelope power and corresponds to the sync tip power you measured when there was no video connected and the pedestal pot at maximum. This power level is constant from then on no matter what you do with the video gain or pedestal pot levels in our transmitters by the design of the video modulator.
Go to: